Working Around MS Access' Restrictions on Hiding Columns

While viewing a table in datasheet view, you can hide one or more columns.

You do this by selecting the column(s), Right clicking and then selecting Hide Columns.

There is a restriction - in order to hide more than one column using this method, the columns must be next to each other.

Here's the workaround. Instead of selecting the column and right-clicking, go to the Format menu. Select Unhide columns.

Visit probiztechnology.com for Atlanta Access, Word, Outlook, PowerPoint and Publisher Training.

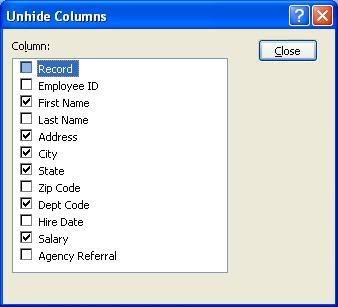
Make sure any columns you want to hide are unchecked. In this example, the Record, EmployeeID, LastName, ZipCode, HireDate, and AgencyReferral columns are all hidden.

Access 2003 Tip - Sort by More than One Column (In Datasheet View)


The students in a MS Access class I recently taught found this tip very helpful.

With MS Access queries, you can sort a set a data by more by one or more columns.

What if you need a quick way to sort without using a query?
Double-click on a table's name, to open it in Datasheet view. Click on one of the sort buttons, to sort the records in ascending or descending order.


But what if you want to sort by more than one column? Select the columns. Click on the sort button.

There are some restrictions to sorting by more than one column.
  • All of the columns you want to sort must be next to each other.
  • All of the sorting must be in one direction (i.e., you must sort all columns in ascending or descending order).
What if you don't want the columns next to each other?

Click and drag to move the columns next to each other, sort the columns, and then move the columns back to where you need them.

Automate your Standard Emails with MS Outlook

Every single business professional finds themselves sending the same emails over and over.

Some examples from my business are:
  • Responses to leads from my website,
  • "How we work" email for new clients,
  • Responses to commonly asked questions.
You can save tons of time by creating standard email messages as Microsoft Outlook signature files, inserting and customizing them when the situation warrants it.

Creating a Standard Email using Microsoft Outlook Signatures..

  1. Create and edit the message in Microsoft Word.

  2. Select and copy all of the text in the message.

  3. In Microsoft Outlook, click on the Tools menu, and select Options .

  4. Make sure the Mail Format tab is selected.

  5. Click on Signature, then New.

  6. Type in a name for your signature, ex., Directions.

  7. Select Start with a Blank Signature.

  8. Click Next.

  9. Under This text will be included in outgoing mail messages, paste the text. You can use the Font or Advanced Edit buttons to make changes to your signature.
Using your Signature.

While editing your email message, click on the Insert Menu, then Signature. Select and insert the signature.


This is one of my favorite time-savers of all time. So, make a list of all of your routine email messages and start creating signatures!