Showing posts with label Microsoft Access 2003 Tutorial. Show all posts

Access 2007 Tip - Adding a Background Picture to a Form

MS Access 2007 Tip - Adding a background picture to a form.

A student in a recent Access class asked, "How do I add a picture  or logo as a background graphic on my form?"

The steps to do this  are simple, and involve accessing the properties of a form.

  • Open the form in design view.
    • Right-click on the form's name in the navigation pane.
    • Select Design View.

      Access 2007 - Opening a form in design view
  • Once the form opens in design view, make sure you've selected the Design tab on your ribbon.

  • In the far right side of the ribbon, click Properties (in the Tools group).

    Access 2007 Form - Open Property Sheet
  • Once the properties box opens, click the format tab.

    Access 2007 Form property sheet
  • Click next to the Picture property. Click the button that pops up, and select the picture you would like to have become the background of your form. You can also change the picture tiling, alignment, type and size mode properties to make additional changes to your pictures.

Access Training in Atlanta, GA and Online
Access Database Design Process - Overview

Designing a database is both an art and a science. In our Access Database Design Bootcamp course, I teach a step-by-step process to designing a database. The class also includes a case study, where students have the opportunity to design a database in class.

Source: Access Database Design Bootcamp.

  1. Gather Requirements.
    Interview the primary decision maker and key database users to determine the purpose and scope of your database. Collect sample files and documents to determine what they are currently using to accomplish database activities. In some cases, the team may be using a hodge-podge of Excel and Word files to accomplish the tasks they want the database to handle.

  2. Sketch Forms & Reports.
    Sketch all forms and reports on paper and give them to the key users to approve.

  3. List fields.
    Use the approved forms to list every single item you need to track in the database. These will become your database fields. Describe what each field is supposed to track.

  4. Map fields to tables (on paper).
    Create a preliminary list of tables. Assign each field to a table.

  5. Normalize your draft tables (on paper).
    Normalization will reduce redundancy and errors.

  6. Establish relationships between tables (on paper).
    Link tables to establish 1-to-many relationships, and create linking tables to implement many-to-many relationships.

  7. Create tables (in Accesss).
    Now that you've sketched your tables on paper and mapped your relationships, create your tables in Access and enter sample data.
    For more information, see our Access Module I - Tables Class.

  8. Create your queries, forms and reports (in Access).
    Use the documents you've worked on thus far to create your queries, forms, and reports. For more information, see our Access Queries, and our Forms & Reports classes.

  9. Test your database.
    Test your database yourself, and then present it to your key users to review and test. Repeat this process until you have a deliverable database.

MS Access 2003 - Adding Tables from Another Database into a Query

The traditional way of adding a table from an external database into a query is by linking the table to your database.

There is another way, however.

In the query design grid, right click anywhere in the grey area.

Click Properties.

When the properties window pops up, type the full path of the external database in the Source Database box.

For additional information about designing Access Queries, see our course: Access Queries from A to Z.

Access Tip - Automatically Convert Text Fields to Uppercase

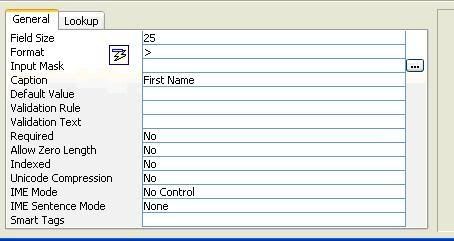
To automatically convert the text in a field to uppercase, no matter how someone enters the data, set the Format property to >.

Select the table from the list of tables in your database.

On the list of tables in your Access database, select the table. Click Design View. Move your cursor to the field you are formatting (the field has to be a text field). In the Field Properties section of your screen (bottom half of screen), make sure the General tab is selected.

Type > next to Format, as shown below.

Picture of Access Table Design Properties Screen - probiztechnology.com

For additional information: Access Database Design Bootcamp

Working Around MS Access' Restrictions on Hiding Columns

While viewing a table in datasheet view, you can hide one or more columns.

You do this by selecting the column(s), Right clicking and then selecting Hide Columns.

There is a restriction - in order to hide more than one column using this method, the columns must be next to each other.

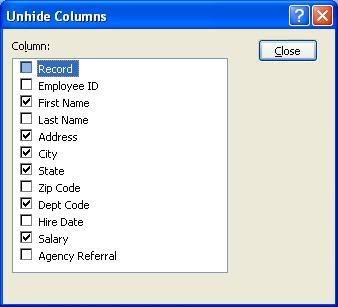
Here's the workaround. Instead of selecting the column and right-clicking, go to the Format menu. Select Unhide columns.

Visit probiztechnology.com for Atlanta Access, Word, Outlook, PowerPoint and Publisher Training.

Make sure any columns you want to hide are unchecked. In this example, the Record, EmployeeID, LastName, ZipCode, HireDate, and AgencyReferral columns are all hidden.

Access 2003 Tip - Sort by More than One Column (In Datasheet View)


The students in a MS Access class I recently taught found this tip very helpful.

With MS Access queries, you can sort a set a data by more by one or more columns.

What if you need a quick way to sort without using a query?
Double-click on a table's name, to open it in Datasheet view. Click on one of the sort buttons, to sort the records in ascending or descending order.


But what if you want to sort by more than one column? Select the columns. Click on the sort button.

There are some restrictions to sorting by more than one column.
  • All of the columns you want to sort must be next to each other.
  • All of the sorting must be in one direction (i.e., you must sort all columns in ascending or descending order).
What if you don't want the columns next to each other?

Click and drag to move the columns next to each other, sort the columns, and then move the columns back to where you need them.

MS Office Tip - Save Time by Adding Buttons to your Toolbar

This tip shows you how to add buttons to any toolbar in the Microsoft Office 2003 suite (Access, Excel, Outlook, PowerPoint, Publisher, etc.)

Why would you use this, may ask? I have found that adding a couple of buttons to the toolbar for frequently used commands speeds up my productivity. A perfect example, from Microsoft Excel, is the button to delete a row from a spreadsheet. Clicking on a button is a lot faster than having to go through the Edit menu each time I need to remove a row.

Here are the instructions for adding the Insert Rows button to your toolbar. Although this is an Excel command, similar steps will work for all MS Office programs.

  • Right click in the blue area to the right of any of your toolbars.

  • Click on Customize.

  • When the dialog box pops up, click on the Commands tab.

  • Under the Categories list box, click on Edit.

  • Scroll down the Commands list box until you come to Delete Rows

  • Click on Delete Rows and drag it to any toolbar.
Voila! You're done. The next time you need to delete a row, simply click on the button you've added to your toolbar.

Now, go and experiment to see how many buttons you can add to your existing Access, Excel, Outlook, PowerPoint or Publisher toolbars to save you tons of time.

Access 2003 Tip - Format a Number with Leading Zeros

Sometimes, it is important for a number to show up with leading zeros. This is often the case with identifiers such as part numbers of member ids. Here's a trick I recently used while developing an Access Database for a client.


  1. Open the table in Design view.
  2. Make sure the Datatype of the field is set to Number.
  3. Select the General tab.
  4. Click on the Format line, and set the format to 00000.

This forces all numbers in that field to show up in 5 digits with leading zeros.
For example:
7 is now 00007,
567 is now 00567,
1200 is now 01200.