Showing posts with label Microsoft OUTLOOK 2003 Tutorial. Show all posts

Outlook 2007 - House Cleaning Tips

If you feel as if keeping your inbox clean in an on-going battle, you are not alone. Here are a couple of quick housecleaning tips for Outlook 2007.

Permanently delete messages.
When you hit the "Delete" key, your messages are moved to your Deleted Items folder. In order to permanently delete them, you have to empty the Deleted Items folder.

You can merge the two steps into one by:
  • Selecting the message, and
  • Pressing the Shift key while you hit Delete. You can also select multiple messages, and permanently delete them in one fell swoop.
Save an attachment to your hard drive.
You do not have to have an email message open in order to save its attachment to your hard drive.

You can simply:
  • Highlight the email
  • Click the File menu
  • Click Save attachments, and then the name of the attachment. Outlook will open a browse window so that you can select the storage folder on your hard drive.
    • (Alternatively, you can type ALT + F + N + Enter.)
Remove an attachment from an email.
One of the constant complaints I get from corporate clients is that they have a tough time keeping their Outlook mailboxes within the size recommended by their IT departments. An option is to first save the attachment using the method I explained above, and then remove the attachment so that it no longer takes up space in Outlook.
  • Double-click the message to open it.
  • Right-click the attachment.
  • Select Remove. Remember: If you think you will need the attachment later, save it.
  • Close the email message.
Save emails as text files.
There are some emails you really don't need, but may want to keep a record of just in case. You can always save the text of the email messages as text files. A benefit of this tactic is text files take up very little space on your hard drive.
  • Highlight one or more email messages.
  • Click the File menu, then Save As (or ALT + F + A).
  • Under the Save as Type box, change the file type to Text Only (.txt)
  • The email messages are now saved to your hard drive, and you can delete them from Outlook if you wish. Keep in mind, attached files will not be saved. (The name of the attached file will be saved in the text file.)
Would you like more tips?
Contact me about Outlook training, offered in the following formats: 1-on-1 private training, group classes, lunch & learn seminars offered face-to-face or online. 
training AT probiztechnology DOT com
Outlook Tip: Change Subject Line

Let's say you received an email from someone with a blank subject line, or a subject line that doesn't match the email's content. You'd like to edit the subject line so that the email message is easy to find.

Simply double-click in the grey subject line area, type in your new subject, and it's done.

Outlook Tip: Quickly Add Items to Categories

When I teach an Outlook class, students are always thrilled to learn about Outlook's Categories feature. Outlook allows you to assign items (ex., contacts) to a specific category (ex., Prospects). You can then perform activities such as send emails to everyone in your Clients category, generate mailing labels for everyone in your Prospects category and more.

Students usually cannot wait to get back to their offices and start assigning their Outlook items to categories.

Assigning Categories can be time-consuming, however. Imagine you have 1,000 contacts you'd like to add to your Prospects category. Assigning Categories the long way could take hours. You'd have to open each Contact, click the Categories button, check off the Prospects Category, close the Category box, Save and Close the Contact.

Fortunately, there's a much quicker and easier way.
  • Select the contacts you want to add to a category.
  • Right click.
  • Select Categories.
  • Click the check box next to the category (ex., "Clients").

In one step, all of the contacts you've selected are added to that category.

Automate your Standard Emails with MS Outlook

Every single business professional finds themselves sending the same emails over and over.

Some examples from my business are:
  • Responses to leads from my website,
  • "How we work" email for new clients,
  • Responses to commonly asked questions.
You can save tons of time by creating standard email messages as Microsoft Outlook signature files, inserting and customizing them when the situation warrants it.

Creating a Standard Email using Microsoft Outlook Signatures..

  1. Create and edit the message in Microsoft Word.

  2. Select and copy all of the text in the message.

  3. In Microsoft Outlook, click on the Tools menu, and select Options .

  4. Make sure the Mail Format tab is selected.

  5. Click on Signature, then New.

  6. Type in a name for your signature, ex., Directions.

  7. Select Start with a Blank Signature.

  8. Click Next.

  9. Under This text will be included in outgoing mail messages, paste the text. You can use the Font or Advanced Edit buttons to make changes to your signature.
Using your Signature.

While editing your email message, click on the Insert Menu, then Signature. Select and insert the signature.


This is one of my favorite time-savers of all time. So, make a list of all of your routine email messages and start creating signatures!

MS Office Tip - Save Time by Adding Buttons to your Toolbar

This tip shows you how to add buttons to any toolbar in the Microsoft Office 2003 suite (Access, Excel, Outlook, PowerPoint, Publisher, etc.)

Why would you use this, may ask? I have found that adding a couple of buttons to the toolbar for frequently used commands speeds up my productivity. A perfect example, from Microsoft Excel, is the button to delete a row from a spreadsheet. Clicking on a button is a lot faster than having to go through the Edit menu each time I need to remove a row.

Here are the instructions for adding the Insert Rows button to your toolbar. Although this is an Excel command, similar steps will work for all MS Office programs.

  • Right click in the blue area to the right of any of your toolbars.

  • Click on Customize.

  • When the dialog box pops up, click on the Commands tab.

  • Under the Categories list box, click on Edit.

  • Scroll down the Commands list box until you come to Delete Rows

  • Click on Delete Rows and drag it to any toolbar.
Voila! You're done. The next time you need to delete a row, simply click on the button you've added to your toolbar.

Now, go and experiment to see how many buttons you can add to your existing Access, Excel, Outlook, PowerPoint or Publisher toolbars to save you tons of time.

Outlook Tip - Quickly Calculate Dates

In a previous Outlook tip, Write Now, Send Later, I talked about using Outlook's Message Options feature to send an email at a later date.


Here's another shortcut that I use when:
  • scheduling a Message for future delivery,
  • setting appointments in Calendar, or
  • setting deadlines in Tasks.


Did you know Outlook saves you the hassle of looking up a date? If you want to set a task deadline for 6 weeks from now, for example, all you have to do is type +6w in the due date field. Outlook automatically calculates the dates for you.


Here are some other date shortcuts:

  • d: days
  • h: hours
  • m: minutes
  • mo: months
  • y: years


So, 90 minutes from now will be entered as +90m.


Hope you find this helpful.

Outlook Tip: Write Now, Send Later


Let's say you have a conference call with a strategic partner next Wednesday. Prior to the meeting, you want to send her a reminder as well as a note covering items you'd like to discuss.

Since you've just set up the meeting, your mind is full of ideas. The most efficient use of your time is to go ahead and write the note while the topic is top of mind.

Microsoft Outlook® allows you to write the
email now, and send it later. Here's how you do it.

1. Prepare the email.


2. Click on your View Menu, and Select Options.

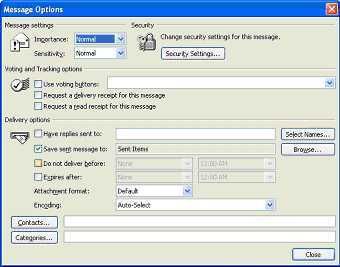
The Message Options dialog box pops up.


3. Place a check mark next to Do not deliver before: and select the date and time you want the message delivered.

4. Click Send. Outlook® will keep the email in your Outbox, and send it at the scheduled date and time. Outlook ® has to be connected to the Internet when it is time to send the email.


Those of you who have used Microsoft software for any length of time know Microsoft provides many ways to accomplish one task. This is the quickest and easiest way I've found to schedule emails.

How yours truly used technology to save $5,000 a year

One of the guiding principles in my business is I show business professionals ways they can use technology to save time, lower costs or generate revenue.

Here's a real life example, based on an Excel project I was working on this morning.

Project overview: This project involves updating a 290 row, 10 column spreadsheet. Just for grins and giggles, I decided to try updating the sheet manually, and then using Excel formulas to get the job done - just to see how much time and money I would save.

The old (expensive) way: It took 1 hour and 57 minutes to update 63 rows, at a typing speed of 80+ words per minute. At this rate, it would have taken another 7.02 hours to complete this project. (I started at 8:36 am and finished 63 rows at 10:33 am).

The smarter way: Through modifying and combining a couple of Excel formulas, I was able to finish the remaining 157 rows in 13 minutes!

This included the time spent:
  • modifying the formula,
  • copying and pasting it throughout the spreadsheet,
  • creating a formula to test my results, and
  • correcting 4 errors.
    Note: I made the errors while updating the report the slow and expensive way. Without formulas, I wouldn't have been able to test my results and catch errors.

The bottom line: Let's assume this report is generated once a month. By properly using Excel, I will save $4,908 of my time each year. If this is a weekly report, the annual savings are a whopping $21,268.

My point: Properly using technology not only saves time and money, it may also save your reputation (by enabling you to check results).

For additional information, see Learn Excel Formulas from A to Z - Atlanta Excel Training Class.