Let's say you received an email from someone with a blank subject line, or a subject line that doesn't match the email's content. You'd like to edit the subject line so that the email message is easy to find.
Simply double-click in the grey subject line area, type in your new subject, and it's done.
Outlook Tip: Quickly Add Items to Categories
When I teach an Outlook class, students are always thrilled to learn about Outlook's Categories feature. Outlook allows you to assign items (ex., contacts) to a specific category (ex., Prospects). You can then perform activities such as send emails to everyone in your Clients category, generate mailing labels for everyone in your Prospects category and more.
Students usually cannot wait to get back to their offices and start assigning their Outlook items to categories.
Assigning Categories can be time-consuming, however. Imagine you have 1,000 contacts you'd like to add to your Prospects category. Assigning Categories the long way could take hours. You'd have to open each Contact, click the Categories button, check off the Prospects Category, close the Category box, Save and Close the Contact.
Fortunately, there's a much quicker and easier way.
In one step, all of the contacts you've selected are added to that category.
Students usually cannot wait to get back to their offices and start assigning their Outlook items to categories.
Assigning Categories can be time-consuming, however. Imagine you have 1,000 contacts you'd like to add to your Prospects category. Assigning Categories the long way could take hours. You'd have to open each Contact, click the Categories button, check off the Prospects Category, close the Category box, Save and Close the Contact.
Fortunately, there's a much quicker and easier way.
- Select the contacts you want to add to a category.
- Right click.
- Select Categories.
- Click the check box next to the category (ex., "Clients").
In one step, all of the contacts you've selected are added to that category.
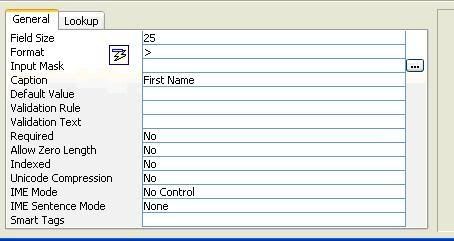
Access Tip - Automatically Convert Text Fields to Uppercase
To automatically convert the text in a field to uppercase, no matter how someone enters the data, set the Format property to >.
Select the table from the list of tables in your database.
On the list of tables in your Access database, select the table. Click Design View. Move your cursor to the field you are formatting (the field has to be a text field). In the Field Properties section of your screen (bottom half of screen), make sure the General tab is selected.
Type > next to Format, as shown below.
For additional information: Access Database Design Bootcamp
Subscribe to:
Posts (Atom)